
Spring Boot Spring Data JPA with Hibernate and H2 Web Console
The H2 database provides a browser-based web console that Spring Boot can auto-configure for you. In order to let spring auto-configure the H2 Web Console, we have to make sure we are developing a web application, make sure the com.h2database:h2 dependency resides on the classpath and we are using the org.springframework.boot:spring-boot-devtools. You can also manually configure the h2 web console. In the following tutorial we demonstrate how to configure the H2 Web Console using Spring Boot, Spring Data with Hibernate.
Maven Dependencies
We use Apache Maven to manage our project’s dependencies. Since we are working with a spring boot web application, make sure the org.springframework.boot:spring-boot-starter-web resides on the classpath. For working with spring-data-jpa we need the org.springframework.boot:spring-boot-starter-data-jpa dependency. When you want to work with the in-memory h2 database and the web console, we also need to add the com.h2database:h2 dependency.
<?xml version="1.0" encoding="UTF-8"?>
<project xmlns="http://maven.apache.org/POM/4.0.0"
         xmlns:xsi="http://www.w3.org/2001/XMLSchema-instance"
         xsi:schemaLocation="http://maven.apache.org/POM/4.0.0
                             http://maven.apache.org/xsd/maven-4.0.0.xsd">

    <modelVersion>4.0.0</modelVersion>
    <groupId>com.memorynotfound.springboot</groupId>
    <artifactId>h2-webconsole</artifactId>
    <version>1.0.0-SNAPSHOT</version>
    <url>https://memorynotfound.com</url>
    <name>Spring Boot - ${project.artifactId}</name>

    <parent>
        <groupId>org.springframework.boot</groupId>
        <artifactId>spring-boot-starter-parent</artifactId>
        <version>1.5.3.RELEASE</version>
    </parent>

    <dependencies>
        <dependency>
            <groupId>org.springframework.boot</groupId>
            <artifactId>spring-boot-starter-web</artifactId>
        </dependency>

        <!-- database -->
        <dependency>
            <groupId>org.springframework.boot</groupId>
            <artifactId>spring-boot-starter-data-jpa</artifactId>
        </dependency>
        <dependency>
            <groupId>com.h2database</groupId>
            <artifactId>h2</artifactId>
        </dependency>
    </dependencies>

    <build>
        <plugins>
            <plugin>
                <groupId>org.springframework.boot</groupId>
                <artifactId>spring-boot-maven-plugin</artifactId>
            </plugin>
        </plugins>
    </build>

</project>
Simple POJO
We create a simple POJO which we’ll annotate with javax.persistence api annotations.
package com.memorynotfound.springboot;

import javax.persistence.*;

@Entity
@Table(name = "tbl_book")
public class Book {

    @Id
    @GeneratedValue(strategy = GenerationType.IDENTITY)
    private Long id;
    private String name;
    private Double price;

    public Book() {
    }

    public Book(String name, Double price) {
        this.name = name;
        this.price = price;
    }

    public Long getId() {
        return id;
    }

    public void setId(Long id) {
        this.id = id;
    }

    public String getName() {
        return name;
    }

    public void setName(String name) {
        this.name = name;
    }

    public Double getPrice() {
        return price;
    }

    public void setPrice(Double price) {
        this.price = price;
    }

    @Override
    public String toString() {
        return "Book{" +
                "id=" + id +
                ", name='" + name + '\'' +
                ", price=" + price +
                '}';
    }
}
Configure Spring, JPA, Hibernate and H2 Console
When working with any database, we need to configure a datasource, database-driver and access control. In the following configuration files we configure an in-memory h2 database using hibernate.
Note:To make sure the H2 Web Console can access the database we’ll have to append DB_CLOSE_DELAY=-1 and DB_CLOSE_ON_EXIT=FALSE to the spring.datasource.url property.
- spring.h2.console.enabled enable the console.
- spring.h2.console.path path at which the console will be available.
- spring.h2.console.settings.trace enable trace output.
- spring.h2.console.settings.web-allow-others enable remote access.
The application.yml configuration
I personally prefer working with YAML documents as it is more descriptive than properties file.
###
#   Database Settings
###
spring:
  datasource:
    url: jdbc:h2:mem:example-app;DB_CLOSE_DELAY=-1;DB_CLOSE_ON_EXIT=FALSE
    platform: h2
    username: sa
    password:
    driverClassName: org.h2.Driver
  jpa:
    database-platform: org.hibernate.dialect.H2Dialect
    hibernate:
      ddl-auto: update
    properties:
      hibernate:
        show_sql: true
        use_sql_comments: true
        format_sql: true

###
#   H2 Settings
###
  h2:
    console:
      enabled: true
      path: /console
      settings:
        trace: false
        web-allow-others: false
The equivalent application.properties configuration file
I’ve added the equivalent properties.
###
#   Database Settings
###
spring.datasource.url=jdbc:h2:mem:example-app;DB_CLOSE_DELAY=-1;DB_CLOSE_ON_EXIT=FALSE
spring.datasource.platform=h2
spring.datasource.username = sa
spring.datasource.password =
spring.datasource.driverClassName = org.h2.Driver
spring.jpa.database-platform=org.hibernate.dialect.H2Dialect

###
#   H2 Settings
###
spring.h2.console.enabled=true
spring.h2.console.path=/console
spring.h2.console.settings.trace=false
spring.h2.console.settings.web-allow-others=false

###
#   Hibernate Settings
###
spring.jpa.hibernate.ddl-auto = update
spring.jpa.properties.hibernate.show_sql=false
spring.jpa.properties.hibernate.use_sql_comments=false
spring.jpa.properties.hibernate.format_sql=false
Initialization Database Script
When we add a data.sql file in the src/main/resources folder, h2 database’ll automatically use this script at startup to populate the database. In this script we simply add initialization insert statements.
INSERT INTO tbl_book (id, name, price) VALUES (1, 'Spring Boot - Spring Data JPA with Hibernate and H2 Web Console', 0.0)
Bootstrap Spring Boot Application
Use the following configuration to bootstrap the spring boot application.
package com.memorynotfound.springboot;

import org.springframework.boot.SpringApplication;
import org.springframework.boot.autoconfigure.SpringBootApplication;

@SpringBootApplication
public class Application {

    public static void main(String[] args) throws Exception {
        SpringApplication.run(Application.class, args);
    }

}
Running Spring Boot Application
We can run the spring boot application using the following maven command.
mvn spring-boot:run
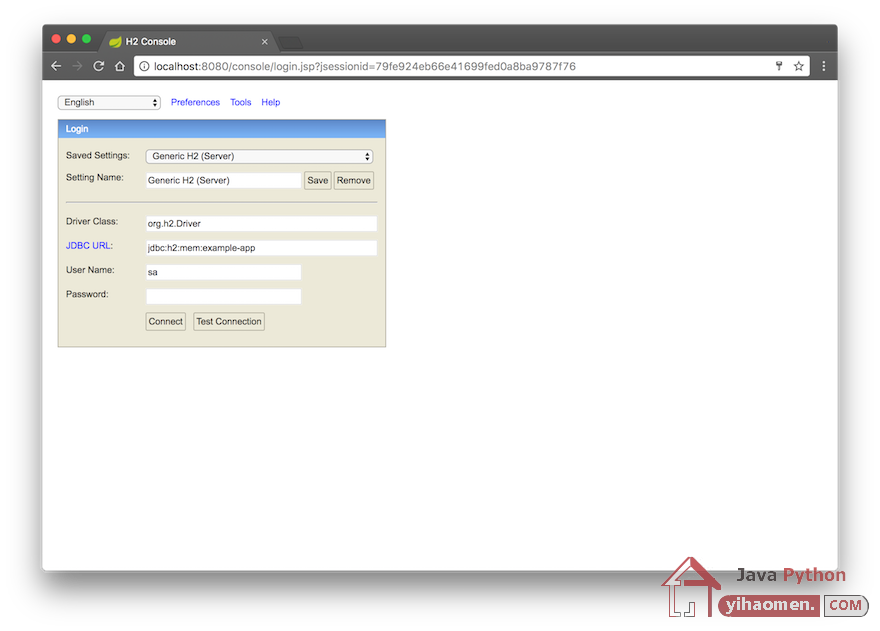
H2 Web Console
We configured the H2 Web Console to be accessible via the /console path. When accessing the console via http://localhost:8080/console we receive the following page.
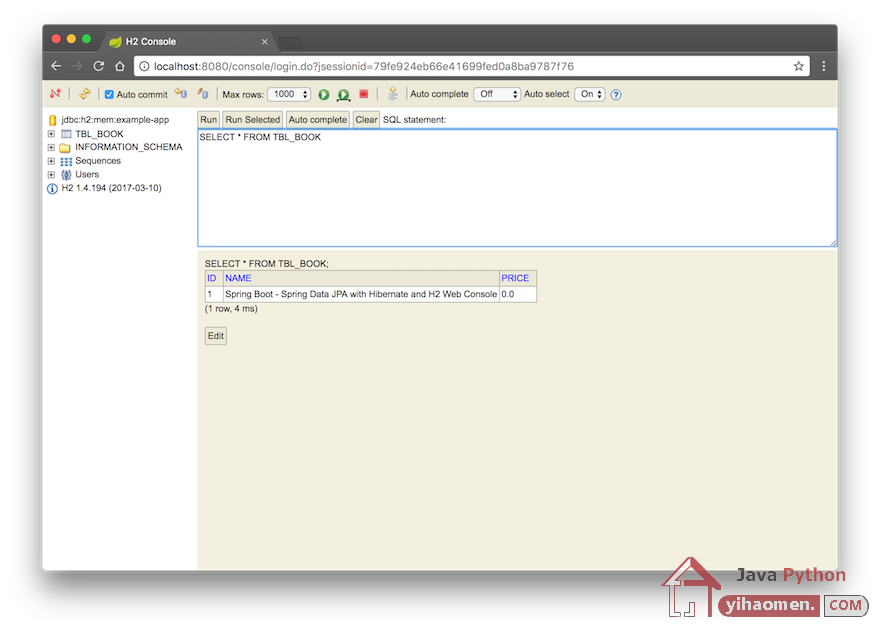
As you can see, we initialized the database with the data.sql script and when we execute a simple sql statement to retrieve all the elements in the table, we receive the following output.
Download
From:一号门
COMMENTS