
利用easyexcel生成excel文件-复杂表头/多表头/自定义表头设计
By:Roy.LiuLast updated:2020-12-02
在上一篇文章( http://www.yihaomen.com/article/1850.html ) 测试了easyexcel生成简单的EXCEL文件,继续测试利用easyexcel生成复杂表头,或者自定义表头的设计。
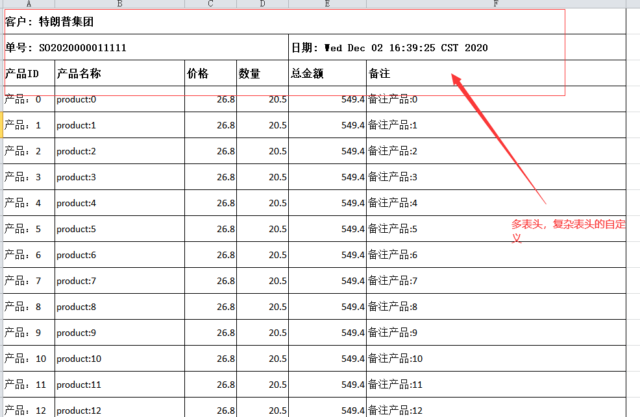
既然是多表头,复杂的自定义表头设计,原来利用注解来实现单元格的宽度,样式等都不能用了,这个时候需要自定义指定参数,测试还是用上一篇文章提到的订单来做,最终实现的效果如下:
先上代码,然后在稍稍解释一下:
package com.yihaomen.myexcel;

import com.alibaba.excel.EasyExcel;
import com.alibaba.excel.metadata.CellData;
import com.alibaba.excel.metadata.Head;
import com.alibaba.excel.write.handler.WriteHandler;
import com.alibaba.excel.write.metadata.holder.WriteSheetHolder;
import com.alibaba.excel.write.metadata.holder.WriteTableHolder;
import com.alibaba.excel.write.metadata.style.WriteCellStyle;
import com.alibaba.excel.write.metadata.style.WriteFont;
import com.alibaba.excel.write.style.HorizontalCellStyleStrategy;
import com.alibaba.excel.write.style.column.AbstractColumnWidthStyleStrategy;
import com.yihaomen.myexcel.domain.Detail;
import com.yihaomen.myexcel.domain.Master;
import org.apache.poi.ss.usermodel.*;
import org.junit.Before;
import org.junit.Test;
import org.springframework.boot.test.context.SpringBootTest;
import sun.security.x509.CertAttrSet;

import java.io.File;
import java.math.BigDecimal;
import java.util.ArrayList;
import java.util.Date;
import java.util.List;

@SpringBootTest
public class WriteExcel_1 {
    private Master master;
    private List<Detail> details = new ArrayList<>();

    /**
     * 初始化测试数据
     */
    @Before
    public void initData() {
        master = new Master();
        master.setCustomer("特朗普集团");
        master.setSheetNo("SO2020000011111");
        master.setCreatedDate(new Date());

        for(int i=0; i<100; i++) {
            Detail d = new Detail();
            d.setProductId("product:" + i);
            d.setProductName("产品:" + i);
            d.setPrice(new BigDecimal("26.80"));
            d.setNumber(new BigDecimal("20.5"));
            d.setAmount(d.getPrice().multiply(d.getNumber()));
            d.setMemo("备注产品:" + i);
            details.add(d);
        }
    }

    /**
     * 仅仅输出明细数据到excel文件
     */
    @Test
    public void writeSimpleExcelForDetail() {
        String path = this.getClass().getResource("/").getPath();
        System.out.println(path);
        String fileName = path + File.separator + "writeSimpleExcel.xlsx";
        // 这里 需要指定写用哪个class去写,指定模板名称及数据
        EasyExcel.write(fileName, Detail.class).sheet("sheet名称").doWrite(details);
    }

    /**
     * 仅仅输出明细数据到excel文件, 排除部分字段
     */
    @Test
    public void writeSimpleExcelExculdeColumns() {
        String path = this.getClass().getResource("/").getPath();
        List<String> excludeColumns = new ArrayList<>();
        excludeColumns.add("memo");
        String fileName = path + File.separator + "writeSimpleExcel.xlsx";
        // 这里 需要指定写用哪个class去写,指定模板名称及数据
        EasyExcel.write(fileName, Detail.class).excludeColumnFiledNames(excludeColumns).sheet("sheet名称").doWrite(details);
    }

    /**
     * 仅仅输出明细数据到excel文件, 增加自定义的头部
     */
    @Test
    public void writeSimpleExcelWithHeader() {
        String path = this.getClass().getResource("/").getPath();
        String fileName = path + File.separator + "writeSimpleExcel.xlsx";
        // 准备 HEADER
        List<List<String>> list = getHeader();
        // 这里 需要指定写用哪个class去写,指定模板名称及数据
        EasyExcel.write(fileName).head(list).registerWriteHandler(new CustomizeColumnWidth())
                .registerWriteHandler(getStyleStrategy()).sheet("sheet名称").doWrite(details);
    }

    private List<List<String>> getHeader() {
        /**
         * 打算展示成如下样子
         * |客户:xxx 公司 (这一行需要合并单元格)
         * |单号: SO22222222222222|  日期: 2020-01-01 (分别需要合并单元格)
         * |产品ID|产品名称|价格|数量|总金额|备注|
         */
        String customer = "客户: " + master.getCustomer();
        String sheetNo = "单号: " + master.getSheetNo();
        String dateStr = "日期: " + master.getCreatedDate();
        List<List<String>> list = new ArrayList<List<String>>();
        List<String> head0 = new ArrayList<String>();
        head0.add(customer);
        head0.add(sheetNo);
        head0.add("产品ID");
        List<String> head1 = new ArrayList<String>();
        head1.add(customer);
        head1.add(sheetNo);
        head1.add("产品名称");
        List<String> head2 = new ArrayList<String>();
        head2.add(customer);
        head2.add(sheetNo);
        head2.add("价格");

        List<String> head3 = new ArrayList<String>();
        head3.add(customer);
        head3.add(sheetNo);
        head3.add("数量");

        List<String> head4 = new ArrayList<String>();
        head4.add(customer);
        head4.add(dateStr);
        head4.add("总金额");

        List<String> head5 = new ArrayList<String>();
        head5.add(customer);
        head5.add(dateStr);
        head5.add("备注");

        list.add(head0);
        list.add(head1);
        list.add(head2);
        list.add(head3);
        list.add(head4);
        list.add(head5);
        return list;
    }

    private HorizontalCellStyleStrategy getStyleStrategy() {
        // 头的策略
        WriteCellStyle headWriteCellStyle = new WriteCellStyle();
        // 设置对齐
        headWriteCellStyle.setHorizontalAlignment(HorizontalAlignment.LEFT);
        // 背景色, 设置为白色,也是默认颜色
        headWriteCellStyle.setFillForegroundColor(IndexedColors.WHITE.getIndex());
        // 字体
        WriteFont headWriteFont = new WriteFont();
        headWriteFont.setFontHeightInPoints((short) 12);
        headWriteCellStyle.setWriteFont(headWriteFont);

        // 内容的策略
        WriteCellStyle contentWriteCellStyle = new WriteCellStyle();
        // 这里需要指定 FillPatternType 为FillPatternType.SOLID_FOREGROUND 不然无法显示背景颜色.头默认了 FillPatternType所以可以不指定
        // contentWriteCellStyle.setFillPatternType(FillPatternType.SOLID_FOREGROUND);
        // contentWriteCellStyle.setFillPatternType(FillPatternType.SOLID_FOREGROUND);

        // 背景绿色
        //contentWriteCellStyle.setFillForegroundColor(IndexedColors.GREEN.getIndex());
        // 字体策略
        WriteFont contentWriteFont = new WriteFont();
        contentWriteFont.setFontHeightInPoints((short) 12);
        contentWriteCellStyle.setWriteFont(contentWriteFont);
        //设置 自动换行
        contentWriteCellStyle.setWrapped(true);
        //设置 垂直居中
        contentWriteCellStyle.setVerticalAlignment(VerticalAlignment.CENTER);
        //设置 水平居中
        // contentWriteCellStyle.setHorizontalAlignment(HorizontalAlignment.CENTER);
        //设置边框样式
        contentWriteCellStyle.setBorderLeft(BorderStyle.THIN);
        contentWriteCellStyle.setBorderTop(BorderStyle.THIN);
        contentWriteCellStyle.setBorderRight(BorderStyle.THIN);
        contentWriteCellStyle.setBorderBottom(BorderStyle.THIN);

        // 这个策略是 头是头的样式 内容是内容的样式 其他的策略可以自己实现
        HorizontalCellStyleStrategy horizontalCellStyleStrategy = new HorizontalCellStyleStrategy(headWriteCellStyle, contentWriteCellStyle);
        return horizontalCellStyleStrategy;
    }

    /**
     * 自定义头部的 列的宽度设置 策略. .
     */
    class CustomizeColumnWidth extends AbstractColumnWidthStyleStrategy {
        @Override
        protected void setColumnWidth(WriteSheetHolder writeSheetHolder, List<CellData> list, Cell cell, Head head, Integer integer, Boolean isHead) {
            // 测试为 COLUMN 宽度定制.
            if (isHead && cell.getRowIndex() == 2) {
                int columnWidth = cell.getStringCellValue().getBytes().length;
                int cellIndex = cell.getColumnIndex();
                switch (cellIndex) {
                    case 0:
                    case 2:
                    case 3:
                        columnWidth = 10;
                        break;
                    case 1:
                        columnWidth = 25;
                        break;
                    case 4:
                        columnWidth = 15;
                        break;
                    case 5:
                        columnWidth = 50;
                        break;
                    default:
                        break;
                }

                if (columnWidth > 255) {
                    columnWidth = 255;
                }
                writeSheetHolder.getSheet().setColumnWidth(cellIndex, columnWidth * 256);
            }
        }

        @Override
        public void beforeCellCreate(WriteSheetHolder writeSheetHolder, WriteTableHolder writeTableHolder, Row row, Head head, Integer columnIndex, Integer relativeRowIndex, Boolean isHead) {
            // 设置行高测试
            int rowIndex = row.getRowNum();
            System.out.println("当前行: " + rowIndex);
            short height = 600;
            row.setHeight(height);
        }
    }
}
测试方式是 writeSimpleExcelWithHeader, 其中通过 getHeader() 方法去得到自定义表头, 注意自定义表头合并部分的写法, 另外,自定义表头样式是通过 getStyleStrategy()方法得到的,头部样式与内容样式是分开设置的。另外对于行高,列框是通过实现了easyexcel 里面提供的方法实现的, 也就是自定义类 CustomizeColumnWidth .
最终生成excel的部分代码,只有少许差别:
EasyExcel.write(fileName).head(list).registerWriteHandler(new CustomizeColumnWidth())
        .registerWriteHandler(getStyleStrategy()).sheet("sheet名称").doWrite(details);
其实里面还是用的POI的方法,通过实现 WriteHandler可以实现很多自己想要的功能。
From:一号门
COMMENTS